
So, you've signed up for HubSpot (whoo!). Now what?
HubSpot is an immensely powerful tool - but it can be daunting when you're just getting started. In order to successfully implement HubSpot, you want to ensure that you follow certain steps when setting up your account.
For more complex setups, you'll likely want to work with an onboarding expert - but this guide will cover just the essentials that you need to know to implement your new account.
If you've had your account for a while, you can also use this guide to make sure you didn't miss anything in your initial setup.
→ Related Content: 10 Common HubSpot Implementation Mistakes New Users Make
HubSpot CRM Implementation Checklist
Below you'll find specifics on how to do each of the following, but use this checklist as a quick reference point for the key steps in implementation. Follow these steps in the order below to avoid connection errors.
☐ Connect Your Inbox
☐ Install Email Extension
☐ Create and Edit Properties
☐ Import Contacts
☐ Create Filters and Views
☐ Define Your Deal Stages
☐ Website Integration (for non-HubSpot sites)
☐ Invite Your Team
HubSpot CRM Implementation Steps
1. Connect Your Inbox
Connecting your inbox to HubSpot allows you to automatically store all the emails you send and receive in your CRM.
What you need:
- A personal email - this should be an email you alone use to send emails to contacts. Most often, your company email address.
- Knowledge of what email provider you use. You can ask your IT department, or check out MxToolbox to look up your email domain's email service provider.
The specifics of how to connect your inbox depend on what email service provider you're using.
➤ Get Started: Use the HubSpot Connected Email Guide
2. Install Email Extension
The HubSpot Sales extension works with your web browser to connect emails you send to your CRM for more detailed tracking. The extension you need will depend on your email host and client. Use this table from HubSpot to find the right version.
| Email host | Gmail or Google Workspace | Office 365 | Any |
| Email client |
Gmail/Workspace in Chrome |
Outlook on the web Outlook.com* |
Outlook 2019 Outlook 2016 Outlook 2013 |
| Operating system | Mac, PC | Mac, PC | PC only |
| System requirements | N/A | N/A | Microsoft Windows 7,8, or 10 Microsoft Outlook 2013 or 2016 Microsoft Visual Studios 2010 tools for Office Runtime .NET 4.6 or higher |
| Connected inbox required | No** | Yes | No** |
| Centrally deploy/install for multiple users | Available | Available | Not available |
| Quick install links |  |
 |
 |
*If you're accessing your email on Outlook.com, you cannot pin the Office 365 add-in in the inbox.
**Some sales tools cannot be used without a connected inbox.
Remember to do this after you've connected your inbox - otherwise, it won't work properly.
3. Create and Edit Properties
Properties power your CRM and make organization possible. Properties store specific information about your contacts. There are default properties that come with the CRM, and custom properties you can create. The possibilities depend on your organization and how you want to parse out data.
Default properties in HubSpot include:
- Contacts - This property stores a lot of data about your contacts, including: became a lead status, industry, lifecycle stage, last contact date, etc. We strongly recommend looking through the full list of data that HubSpot includes about a contact.
- Companies - This property contains a similar wealth of data to the contact property, but it's focused primarily on the company attached to the contact. This includes data like company size, revenue, location, etc.
- Deals - Deal properties help you track the status of a deal, the associated revenue, and other vital information for both sales and marketing.
- Tickets - HubSpot includes a ticketing feature that your team can use for customer support, sales, and marketing. This property stores data associated with the ticketing system.
Get Started:
➤ Learn About the Default Properties: Contacts | Companies | Deals | Tickets
➤ Organize and Export Properties
➤ Property Field Types in HubSpot
4. Import Contacts
This is where the fun begins - it's time to start importing all your current contacts into HubSpot's CRM. You can import contacts via a spreadsheet or Gmail integration.
This step often takes the most time and prep work, so be prepared to dedicate some time to getting this done right. Trust us - it's better to spend extra time making sure your data is clean vs. having to spend even more time later doing fixes.
What to do before you start importing:
- Export your contact data out of your current systems
- Get your contacts into a spreadsheet - either in .csv, .xlsx, or .xls
- Clean up your data - remove irrelevant contacts, and make sure all data is complete and written out correctly (e.g., "thisguy@gmail.com" not "thisguy@gmail")
- Make sure your spreadsheet is only one sheet (not multiple tabs)
- Include a header row where each column corresponds to a property in HubSpot. Column headers can be organized in any order without affecting the import. You can confirm if a default property already exists to match your header or create a custom property prior to importing. Learn more about HubSpot's default properties for contacts, companies, deals, and tickets.
Get Started Importing:
➤ (For Gmail Users) Sync Gmail Contacts
→ Related Content: How to Troubleshoot Import Errors in HubSpot
5. Create Filters & Views
Once you have your properties set and your contacts imported, you can begin creating filters and views. Filters and Views lets you work with contacts based on properties. This helps you sort through data more easily.
You can set up filters in any of the following sections within HubSpot:
- Contacts
- Companies
- Deals
- Tickets
- Payments
- Calls
- Custom Objects
➤ Get Started: View and Filter Records
6. Define Your Deal Stages
Deal stages are vital for your HubSpot account - they tell you where each contact is in their buyer's journey, and what actions must be taken. No matter your business, when converting a lead to a customer, you need to take specific actions.
To successfully use HubSpot, you need to know what actions your team(s) take to guide a lead to a customer, and in what order. These are then broken down into percentages within HubSpot - with 100% being a Close.
By default, HubSpot includes a sales pipeline with seven deal stages:
- Appointment scheduled (20%)
- Qualified to buy (40%)
- Presentation scheduled (60%)
- Decision maker bought-in (80%)
- Contract sent (90%)
- Closed won (100% Won)
- Closed lost (0% Lost)
You can add or remove deal stages as needed for your business. The goal here is to accurately track where a buyer is in their journey, so you can then accurately attribute revenue from deals.
➤ Get Started: Set Up and Customize Your Deal Pipelines and Deal Stages
→ Related Content: How to Get Your Sales Team to Actually Use HubSpot
7. Website Integration
Good news: if your website is also built in HubSpot, you can skip this step.
If your website is not built in HubSpot CMS, you will need to do some manual setup to ensure that you have accurate data on how users interact with your website.
HubSpot's website integration allows you to import leads from your site into your HubSpot account more easily, and to get better data on what they're engaging with. This includes both tracking and lead flows, like pop-ups.
Get Started with Website Integration:
➤ Install the HubSpot Tracking Code
➤ (For WordPress Sites) Install and Use the HubSpot WordPress Plugin
8. Invite Your Team
Now you've gotten all the hard work done, so it's time for the easy (well, easier) part - inviting your team! HubSpot works best when everyone uses it, so you'll want to ensure your team has access to what they need in the system.
You can add as many users as you want to HubSpot CRM, each with their own level of access. This means your team gets that vital visibility, but they can't start editing and removing things they shouldn't.
Get Started with Users:
➤ HubSpot User Permissions Guide
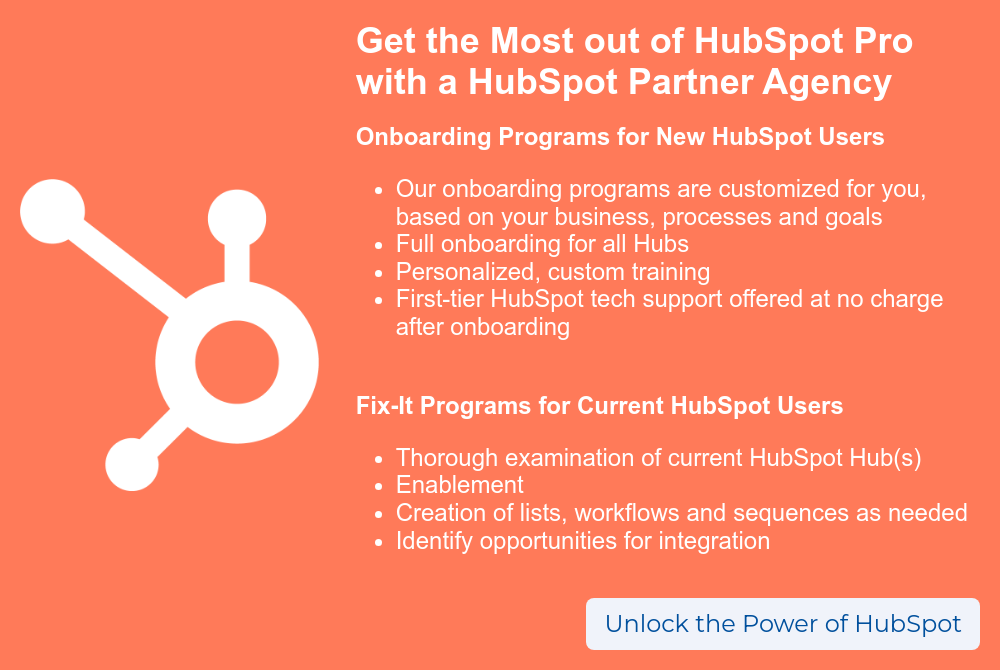
...Or Just Have a HubSpot Partner Agency Do it All For You
If you've been following along, your head might be spinning. Getting HubSpot implemented is a ton of work. That's why you don't have to go it alone.
Working with a HubSpot partner agency means you don't need to become an expert in HubSpot to get up and running.
 BizzyWeb is a HubSpot Platinum Partner and we offer full-service HubSpot onboarding, enablement and strategy for all hubs. Our team has over 196 certifications in HubSpot (and constantly growing). No matter what your HubSpot needs are, our team is ready to handle them.
Plus, we are the only agency in Minnesota with a Platform Enablement Accreditation from HubSpot - sounds fancy, but it means we're top-notch in making HubSpot work within your business.
BizzyWeb is a Minneapolis-based digital marketing and web design agency that helps companies get the high-quality leads they need to grow and thrive. Our tactics include inbound marketing, SEO, advertising, web design, content creation and sales automation. We are an accredited HubSpot Platinum Partner and we offer full-service HubSpot onboarding, enablement and strategy for new and current users.